The interface
Gradient Tools lives entirely in the sidebar (N) under a tab called Gradient Tools. The full toolset is available in two editors, so you can design, apply and inspect wherever you're working:
- the 3D Viewport sidebar, and
- the Image / UV Editor sidebar.

The panels
The tab is split into clear, collapsible panels. Each one has a focused job:
| Panel | Editor | What it's for |
|---|---|---|
| Gradient Tools | Both | The hub: your list of palettes, presets, the live palette preview and a prominent Assign Material button. |
| Strips | Both | Design the palette — add / remove Flat and Gradient strips, edit the active strip, arrange the grid via the Mini Grid Map. |
| Palette Settings | Both | Texture configuration only — name, resolution, color space and UV layer. |
| Apply & Export | Both | Actions — the adaptive Assign Material button (Set Up Object / Refresh Material / Switch to '{palette}'), Bake to Vertex Colors, Save PNG, Show in Image Editor. |
| Material Look | Both | Pick one of six material looks for the selected object — Toon, Flat, Plastic, Glossy, Metal, Glass — and tune its parameters. Keeps the palette colour, changes only the shading. |
| Color Management | Both | Native View Transform, Look and Exposure controls with a one-click reset to Standard. |
| UV Tools | 3D Viewport | The four painting tools (Project / Paint / Radial / Path) and the Target strip selector. |
| Curve Gradient | 3D Viewport | Apply a gradient along a Curve object. Only shown when a curve is active. |
Why two places to design vs. apply?
Design (Strips, Palette Settings) is about building the palette. Apply (UV Tools, Apply & Export) is about putting it on your model. Splitting them keeps each panel short and the workflow obvious.
The core flow: assign, then pick a look
Two panels carry the everyday workflow in 2.5.0:
- Assign the material. In Apply & Export, press the adaptive Assign Material button to set up the object with your palette. It reads Set Up Object on a fresh object, then Refresh Material for the same palette, or Switch to '{palette}' when you point it at a different palette.
- Pick a look. Open the Material Look panel and choose one of the six material looks. The look keeps the exact palette colour and only changes how light plays on it — Flat and Toon stay lighting-independent (the old Shadeless behaviour), while Plastic, Glossy, Metal and Glass add real shading.
The Material Look panel follows your selection
When the selected object (or the selected faces) carry a single look, the panel auto-selects that look so its parameters are editable straight away — no hunting in a dropdown. You can turn this off with the Follow selection in Material Look preference (on by default).
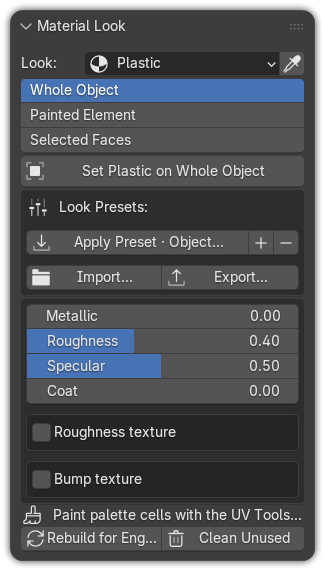
See Material looks for the full reference on the six looks, their tunable parameters and apply scopes.
The status line
When you open a painting tool, Gradient Tools shows a one-line readiness check:
- Ready — Edit Mode and material assigned — everything is set, paint away.
- Otherwise it tells you exactly what's missing (enter Edit Mode, assign the material, select a target strip, …).
This means you never paint "into the void": the panel confirms your object, mode and target strip before you start.
The live palette preview
The Gradient Tools panel shows a thumbnail of the generated palette texture, drawn with grid lines and an accent border on the active strip's cell. It is gamma-correct, so what you see in the panel is exactly what lands on your model.
Tips for a tidy workspace
- Collapse panels you're not using — Blender remembers the state per file.
- Keep the Image / UV Editor open alongside the viewport to use the eyedropper, grid overlay and face tools.
- Press N to toggle the sidebar when you need more screen space.